

As I discussed in my previous article Life Saving Skills – Pulleys for Rope Rescue, pulleys are a great concept to learn as they are a force multiplier in lifting heavy weights. Aside from rescue, pulleys can help you tension a rope far beyond that of simply pulling on a static line. Why might you need a very taught line? Here’s a couple examples:
- – Have a rigid/non sagging line to hang your tarp on for shelter building.
- – Set up a tight safety line to traverse dangerous ridges or similar circumstances.
- – Tie a bundle of material together very tightly.
- – Hang gear above the ground across a line.
- – Or for just plain fun, you can create a tight line for tight-rope walking, otherwise known as slack lining (when using webbing instead of rope).
But what if you only have a rope and do not have carabiners or pulleys? The Versatackle knot, which is a variation of the Trucker’s Hitch, will help you out!
First, let’s learn how to do the Trucker’s Hitch. This hitch is a very simple 3:1 pulley which will create a very taught line. The only downside is that it’s somewhat tricky to put a “finishing knot” on the hitch without letting slack into the system.
So, what is the Versatackle knot?
Very simply, all you are doing is adding another slip knot loop on your line and running the end (tag) line of your rope back and forth through the two loops 2-3 times. What’s the advantage?
First, you have much more mechanical force. A typical Versatackle knot will give you a 5:1 advantage vs. the Trucker’s hitch which is a 3:1. But more importantly, the Versatackle is self-locking. When you put tension on the system, the multiple passes of rope through the loops bind against themselves and lock. However, I would not recommend you use the friction binding by itself! Please do follow up with a finishing knot as seen in the Trucker’s hitch movie above. What the binding friction does do is lock the system so that slack does not enter when you tie the finishing knot.
The only disadvantage to this knot is that it does put strain on a rope’s sheath. If you use this knot multiple times over and over, it can prematurely wear your paracord or rope.
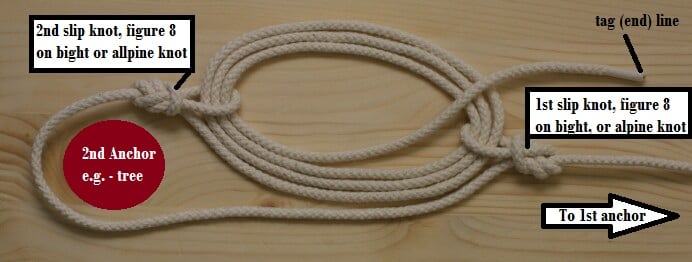
Here’s the step by step knot if you cannot figure it out from the diagram above: 1. Tie a bowline or similar knot to your first anchor.
2. A couple feet prior to wrapping your line around the second anchor, tie a slip knot in the line. Note, you can use different knots instead of a slip knot such as a butterfly alpine knot, figure 8 on a bight, etc.
3. Bend the rope around your second anchor.
4. Tie a second slip knot in your line after it has bent around your second anchor.
5. Now run your tag (end) line through the first slip knot, then back through the second slip knot (or variation knot as described above).
6. Repeat two more times.
7. Pull tight and your knot is complete. Finish the knot with a finishing knot of your choice.
If you want to see an example of this system in use, here is a fun video of a webbing set up in the same fashion using carabiners instead of rope loops. This is a slack line used for tight rope walking. However, you can easily see how you could use the same system for a safety traverse line, haul loads small distances, or set up a tarp ridge line with some paracord.